
Sample collection and smear preparation
Cytology samples can be collected from solid lesions by several techniques including:
- Aspiration cytology – fine needle aspiration (FNA): Ideal for cutaneous or subcutaneous masses since it avoids surface contamination.
- Non-aspiration method: Samples often of equal or better quality than those obtained with the aspiration method (see below). Works well with readily exfoliating tissue such as lymph nodes or when the mass is highly vascular or the cells are fragile. This method involves using a 26-27 g needle and poking it into the tissue, multiple times. After poking the needle into the tissue several times, a 3-6 ml syringe is then attached to the needle hub and the material in the needle is gently placed onto glass slides, near to the frosted edge, before making gentle “contact” not squash smear. This technique is good for tissues that exfoliate well, such as lymph nodes.
- Aspiration method: Needed for poorly exfoliating masses. Routine technique used to obtain tissue for cytologic evaluation.
- Exfoliative cytology:
- Impression smears: Useful in exudative skin lesions and preparation of cytology smears from biopsy specimens. Smears may yield only surface contamination and may not be representative of the lesion. In preparing impression smears from biopsy specimens it is critical to make smears before exposure of the tissue to formalin to avoid staining artifacts from formalin fumes.
- Blot the surface with gauze then “roll” the slide over the tissue. Make 2-3 versus 20 imprints per slide.
- Tissue scrapings: Indicated in flat skin lesions that cannot be easily aspirated or on biopsy specimens that are poorly exfoliating.
- Scrape the surface of a blotted fresh cut of the tissue with the edge of the scalpel blade held perpendicularly.
- Scrape or dab the material on the blade onto several glass slides and make contact (gentle “squash”) smears.
- Aspirates
- Attach a 21-22 g needle to the 5-10 ml syringe (ideal, 3 ml syringes may not achieve sufficient suction), insert into the tissue, pulling firmly on the syringe to aspirate; redirect the needle and re-aspirate several times (without exiting the tissue) to improve sampling.
- A good aspirate has material in the hub and not the syringe (where the material cannot always be retrieved from)
- When completed, remove the needle from the syringe, fill the syringe with air, replace the needle, place the bevel of the needle close to the slide surface, and use the air-filled syringe to gently expel the aspirated tissue onto several slides
- Gently spread the tissue on the slide using the contact (or a gentle “squash”) technique.
- Attach a 21-22 g needle to the 5-10 ml syringe (ideal, 3 ml syringes may not achieve sufficient suction), insert into the tissue, pulling firmly on the syringe to aspirate; redirect the needle and re-aspirate several times (without exiting the tissue) to improve sampling.
-
Splat smear Hints:
- Make and submit multiple slides, “spreader” slides can also be stained or submitted, although cells are often smudged on these slides.
- Stain and examine a slide prior to submission to a laboratory to ensure adequate cellularity of the sample, especially if the animal is still in the hospital or under sedation or anesthesia.
- Aspirate solid areas of cystic masses or masses with soft fluctuant areas as the fluid-filled areas will often only contain poorly cellular fluid, blood or necrotic debris.
- If you obtain fluid from a tissue aspirate, proceed with making smears and submit the fluid in an EDTA-anticoagulant tube as described below for body cavity fluids.
- Try and get solid areas of the mass as mentioned above.
- Be gentle! Use gentle pressure when preparing smears (“contact” and not “squash”) preps and impression smears as cells, particularly neoplastic cells, can rupture easily. With impression smears, roll the slide onto the tissue 2-3 times after blotting the surface. Do not put 20 imprints on one slide (they are exhausting to examine)!
- Avoid thick smears as cells will be impossible to identify if they are not well spread. Using only a small drop of sample will help, especially from tissue that readily exfoliate (ex. lymph nodes) or if peripheral blood contamination has occurred.
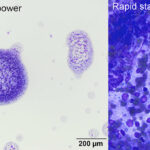
- Avoid “splat” smears, where the cells are sprayed onto the slide. This technique does not avoid smudging and rupturing of the cells and yields thick smears in which the cells do not spread well and are difficult to evaluate. Furthermore, the cells also ruptue from the force of spraying the aspirate onto a slide from a distance. Gentle “contact” smears are preferred instead.
- Post-mortem samples: Collect samples rapidly after death because cells deteriorate quickly, making many post-mortem specimens non-diagnostic
- Impression smears: Useful in exudative skin lesions and preparation of cytology smears from biopsy specimens. Smears may yield only surface contamination and may not be representative of the lesion. In preparing impression smears from biopsy specimens it is critical to make smears before exposure of the tissue to formalin to avoid staining artifacts from formalin fumes.
-
Smear types based on gross features of fluids Body cavity fluids
- Analysis starts at collection, with assessment of fluid color and ease of collection. If the fluid starts off clear and becomes bloody during collection or vice versa, blood contamination is likely. If the fluid remains bloody throughout collection, then hemorrhage or red blood cell (RBC) diapedesis is likely occurring. If the fluid resembles peripheral blood, this could be due to severe hemorrhage or aspiration of a highly vascularized organ, such as the spleen. Differentiation between these possibilities can be accomplished by placing the bloody fluid into a non-anticoagulant (red top) tube. Because blood clots and lyses rapidly in vivo, the absence of a clot supports in vivo hemorrhage versus blood contamination. In contrast, clots in the fluid would argue for blood contamination, although peracute hemorrhage is possible. Visual inspection of fluid color and clarity after collection also yields other helpful information and can guide smear preparation and additional diagnostic testing.
- Tubes: Fluid should be placed into an EDTA-anticoagulated (purple top) tube for cytologic examination. EDTA inhibits bacterial growth and preserves cellular features. Collection into a non-anticoagulant tube is helpful with bloody fluids and is always recommended (volume permitting) in the event biochemical tests or culture are desired, although submission of a culturette is preferred for the latter. For joint fluids, blood culture medium is preferred and may optimize yield of bacteria.
- Point-of-care testing for lactate and glucose concentrations can be done immediately from the aspirated fluid.
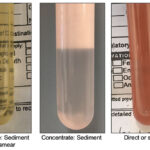
- Make smears: Several smears (2-3) should be made from fluids immediately after collection and rapidly air-dried (with a hair dryer on high aimed at the back of the slides). At the very least, a direct smear from unconcentrated fluid should be made, however this can be paucicellular if the total nucleated cell count is low. Thus, sediment smears from centrifuged samples are recommended for fluids suspected to be of low cellularity (transparent to lightly turbid). Only a portion of the fluid should be centrifuged with the remainder left for cell counts and total protein estimation. Most laboratories also prefer to make their own cytologic smears. For making sediment smears, centrifuge a portion of the fluid (leave the remaining for cell counts), such as in a urine centrifuge. Remove the supernatant with a pipette, leaving around 0.25-0.5 ml of fluid. Resuspend the sediment by mixing up and down with a pipette gently, then make smears. If a pipette is not available, the supernatant can be decanted once quickly. This technique leaves around 0.5 ml fluid remaining for resuspension of the sediment.
- For making smears, you can use the blood or wedge smear technique (see videos) or a “contact” (NOT squash) smear, allowing gentle contact between the two slides (without excess pressure, which will rupture the cells).
- A line smear can be used on clear fluids, which are poorly cellular.
- Making smears of freshly collected fluid avoids these common artifactual changes of storage.
- Deterioration of cells with storage: This affects cell counts and cell identification.
- Swelling of neutrophils: Mimics degenerative change.
- In vitro phagocytic activity: Phagocytosis of RBC and bacteria can occur within 30-120 minutes of sample collection, due to in vitro cellular activity.
- Bacterial proliferation: This can cause cellular lysis.Submission of smears with fluid samples is critical to avoid storage-associated changes that impact cytologic interpretation and diagnostic accuracy of fluid analysis. These changes include:
- Tubes: Fluid should be placed into an EDTA-anticoagulated (purple top) tube for cytologic examination. EDTA inhibits bacterial growth and preserves cellular features. Collection into a non-anticoagulant tube is helpful with bloody fluids and is always recommended (volume permitting) in the event biochemical tests or culture are desired, although submission of a culturette is preferred for the latter. For joint fluids, blood culture medium is preferred and may optimize yield of bacteria.
- Analysis starts at collection, with assessment of fluid color and ease of collection. If the fluid starts off clear and becomes bloody during collection or vice versa, blood contamination is likely. If the fluid remains bloody throughout collection, then hemorrhage or red blood cell (RBC) diapedesis is likely occurring. If the fluid resembles peripheral blood, this could be due to severe hemorrhage or aspiration of a highly vascularized organ, such as the spleen. Differentiation between these possibilities can be accomplished by placing the bloody fluid into a non-anticoagulant (red top) tube. Because blood clots and lyses rapidly in vivo, the absence of a clot supports in vivo hemorrhage versus blood contamination. In contrast, clots in the fluid would argue for blood contamination, although peracute hemorrhage is possible. Visual inspection of fluid color and clarity after collection also yields other helpful information and can guide smear preparation and additional diagnostic testing.
Staining
Most stains used in veterinary medicine are Romanowsky-type stains such as the Diff-Quik® or other rapid stains. Slides being stained in-clinic or being submitted to a reference laboratory should simply be air-dried; prior fixation is not needed (including heat fixation) and may interfere with staining quality. In general follow the recommendations of the manufacturer for staining procedure, though the following hints may be of use:
- Shorten staining times for smears that are thin or of low protein content, similarly thick smears (e.g. from lymph nodes) or those with high protein may need longer staining times, particularly in the blue or final stain.
- Ensure stain reagents are fresh and well filtered, with time and repeated use precipitates may form in the stain making interpretation difficult, the stain may ‘fatigue’ leading to understaining, and organisms may contaminate the reagents.
- Ensure slides are well dried before staining, water may still be present when the slide appears dry, use a hair dryer or leave for sufficient time for adequate drying.
- If staining in-house, store the stain properly: i.e., cap securely to prevent evaporation, and clean jars to minimize stain precipitate and prevent bacterial overgrowth.
Note: Some granules from mast cells and granular lymphocytes will not stain with rapid stains, making it easy to mistake mast cells for other round cells or macrophages and making it difficult to identify granular lymphocytes (prognosis is often different for tumors of granular lymphocytes versus other types of lymphoma).
Sample submission
- Label everything: Smears and tubes should be labeled with the patient identification, date of collection and sample type (type of smear if preparing smears of body cavity fluids) type.
- Submit all smears if sending to a diagnostic laboratory (even if pre-stained) and ship slides in secure, break-proof containers, using plastic slide holders and protective packaging (e.g., bubble wrap, peanuts).
- Diagnostic laboratories prefer to use their own stain; therefore keep slides unstained if submitting to a laboratory. However, if you have stained slides to look at yourself, submit those as well (they may be the only cellular or diagnostic slides).
- Shipping fluids: To minimize storage-associated changes, fluid samples should be shipped promptly and kept refrigerated (on ice packs, avoiding direct contact with the pack to prevent freezing, such as by wrapping the pack in a paper towel).
- Shipping smears: Smears should be kept at 22-24°C and shipped in a break-proof container (plastic is way preferred to cardboard holders, slides often break in the latter).
- Ship cytology slides in a separate container from formalin-fixed tissues because formalin prevents satisfactory staining of the cells and imparts a blue sheen to the smears
- Do not ship in cardboard holders: i.e., slides may break.
- Provide a relevant history, including signalment (age, breed, sex), duration of disease, relevant clinical signs, medication, physical examination findings, and imaging (radiographic, ultrasonographic, endoscopic, computerized tomography, magnetic resonance imaging). Describe the aspirated lesion fully (location, being precise as possible, size, imaging findings, etc).
- Request the right test. Make sure you are asking for the right test, e.g. pleural fluid analysis if you want cytologic examination, nucleated cell counts and protein concentration versus a cytology generic request (which may result in only smears being looked at).
Related links
- View other sample collection pages specific for hematology, hemostasis, chemistry and urinalysis on this website.